Introduction
What is a PWA? According to Wikipedia Progressive Web Applications (PWAs) are a type of mobile app delivered through the web, built using common web technologies including HTML, CSS, and JavaScript. They are intended to work on any platform that uses a standards-compliant browser. Functionality includes working offline, push notifications, and device hardware access, enabling creating user experiences similar to native applications on mobile devices. Since they are a type of webpage or website known as a web application, there is no requirement for developers or users to install the web apps via digital distribution systems like the Apple App store or Google Play.
The second piece of a Blazor PWA is Blazor. So what exactly is Blazor. Chris Sainty said it best in his blog: “I’m just going to say is right from the start, .NET running in the browser. No plugins, no add-ons, no weird transpilation voodoo. THIS IS NOT Silverlight. Just .NET running in the browser.”
Blazor is a feature of ASP.NET web development framework that extends the .NET development platform with tools and libraries for building web applications. Developers can create applications using C#, Razor pages, HTML, and CSS. This application can then executed directly in the browser using WebAssembly on the server via ASP.NET. In April 2019, just prior to Build 2019, Microsoft announced Blazor was no longer experimental and that Microsoft is committed to shipping it as a supported web UI framework. This includes support for running client side in the browser on WebAssembly.
Blazor allows .NET developers to leverage their existing skills and knowledge to deliver responsive and engaging applications with a language and framework that is familiar, has extensive support, existing build in functionality, large eco-system of libraries and packages, is open source and has great developer tooling.
So the question arises, why a Blazor PWA? Well I believe this is the next evolution of Blazor. With a Blazor PWA developers can build a feature rich web-application using C# and the large eco-system of existing .NET libraries and nuget packages. Best of all this application comes from a single code base and executes on all platforms desktop and mobile, a true cross platform application. The rest of this post will describe the steps I used to create a simple Blazor PWA.
Note the source code for this project can be found at github.
Setting up the Environment
As of this writing (30 June 2019) Visual Studio Preview 3 has been released as well as .NET Core 3.0.100-preview6-012264. These will be used to create our Blazor app. Note: we’ll just be creating the Blazor application that is created using the hosted Blazor application template in Visual Studio. The information necessary to setup your development environment is show below.
- Visual Studio Preview 3 may be obtained here.
- See Getting Started with ASP.NET Core Blazor here for details on the tooling and SDKs required for Blazor development.
Creating the Blazor Web-application
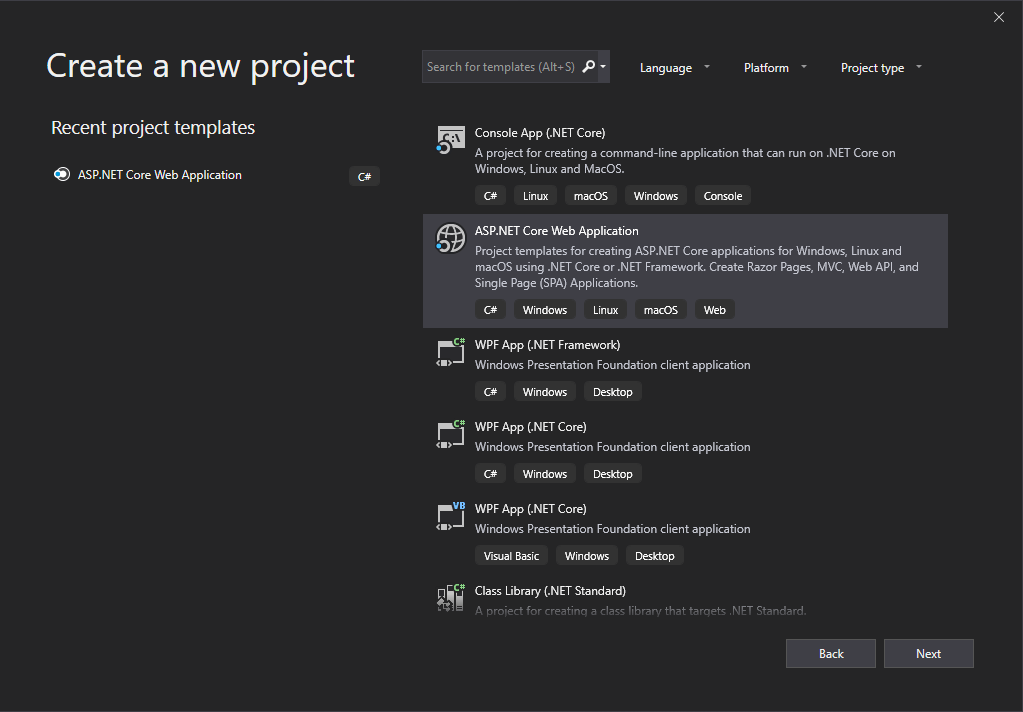
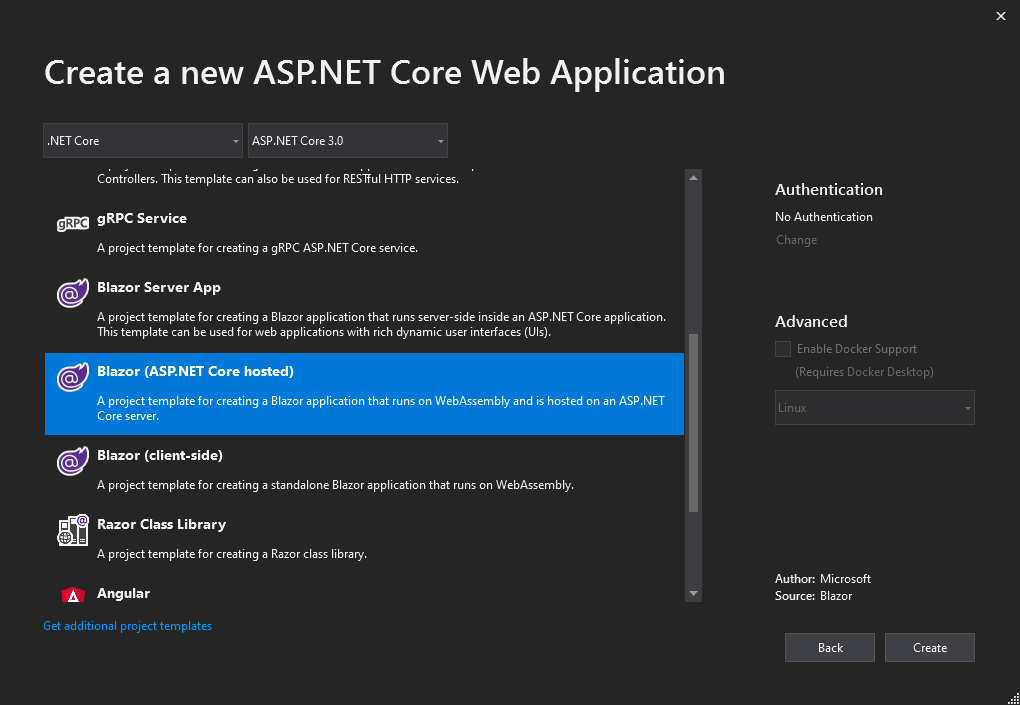
Once the development environment has been established, its time to create our Blazor application using the Hosted Blazor Application Template. Lets create the project using Create a new project > ASP.NET Core Web Application > Blazor (ASP.NET Core Hosted) see below

This creates the following project structure:
HostedBlazorApplication.Client contains the code that executes on WebAssembly within the Client’s browser.
HostedBlazorApplication.Server is the server side project that contains the code which executes on the server using ASP.NET Core.
HostedBlazorApplication.Shared is a shared library that can be used by both the client and server applications.
Run the application using F5, you should see the following:

A fully functional Hosted Blazor application. Next we’re going to transform this Blazor application into a PWA that can be installed on the end users device.
Transforming the Blazor App into a PWA
Now we’re going to transform our Blazor web-application into a PWA. This process involves the following steps:
- Creating and adding a web manifest that contains meta information about the app. This information defines the application name, icons, and information required for client side installation of the app.
- Creating and adding service worker to cache your applications resources and process fetch requests from the app in order to retrieve information from the cache and if the resource is not available in the cache to retrieve the resource from the network and subsequently place the resource in the cache, for the next request.
- A web manifest that contains meta information about the app. This information defines the application name, icons, and information required for client side installation of the app.
- Adding Icons for the installed app, which are cached by the service worker and are defined in the web app manifest.
- Serving the app over https. Note this is not required when serving from localhost.
Google provides a checklist with additional requirements your app should implement in order to provide the best experience.
Creating and Adding the Manifest
Create and add the app manifest.json to the HostedBlazorApplication.Client\wwwroot folder of the project. The manifest should contain the following:
{
  "name": "Blazor PWA Sample",
  "short_name": "Blazor PWA",
  "icons": [
    {
      "src": "icons/icon-192x192.png",
      "sizes": "192x192",
      "type": "image/png"
    },
    {
      "src": "icons/icon-512x512.png",
      "sizes": "512x512",
      "type": "image/png"
    }
  ],
  "start_url": "/",
  "display": "standalone",
  "background_color": "#3a0647",
  "theme_color": "#052767"
}
Note a complete list of web app manifest properties is located here. You can pull the icons from the github project and place them in the HostedBlazorApplication.Client \ wwwroot \ icons folder.
Create and Add a Service Worker
Next we need to create a service worker and install the service worker into browser’s windows.navigator property. At minimum the service worker needs cache resources locally, transition to activation stage where the service worker performs the actions necessary to activate and begins processing fetch requests, and lastly intercept and process fetch requests and fulfill those requests from cache where possible. Add the JavaScript file serviceworker.js to HostedBlazorApplication.Client \ wwwroot folder. Below is the sample service worker we’ll be using for this example:
console.log("This is service worker talking");
var cacheName = 'blazor-pwa-sample';
var filesToCache = [
    '/',
    // Static Html and css files
    '/index.html',
    '/css/site.css',
    '/css/bootstrap/bootstrap.min.css',
    '/css/open-iconic/font/css/open-iconic-bootstrap.min.css',
    '/css/open-iconic/font/fonts/open-iconic.woff',
    // Blazor framework
    '/_framework/blazor.server.js',
    '/_framework/blazor.webassembly.js',
    '/_framework/blazor.boot.json',
    // Our additional files
    '/manifest.json',
    '/serviceworker.js',
    '/icons/icon-192x192.png',
    '/icons/icon-512x512.png',
    // The web assembly/.net dll's
    '/_framework/wasm/mono.js',
    '/_framework/wasm/mono.wasm',
    '/_framework/_bin/Microsoft.AspNetCore.Authorization.dll',
    '/_framework/_bin/Microsoft.AspNetCore.Blazor.dll',
    '/_framework/_bin/Microsoft.AspNetCore.Components.Browser.dll',
    '/_framework/_bin/Microsoft.AspNetCore.Components.dll',
    '/_framework/_bin/Microsoft.AspNetCore.Metadata.dll',
    '/_framework/_bin/Microsoft.Extensions.DependencyInjection.Abstractions.dll',
    '/_framework/_bin/Microsoft.Extensions.DependencyInjection.dll',
    '/_framework/_bin/Microsoft.Extensions.Logging.Abstractions.dll',
    '/_framework/_bin/Microsoft.Extensions.Options.dll',
    '/_framework/_bin/Microsoft.Extensions.Primitives.dll',
    '/_framework/_bin/Microsoft.JSInterop.dll',
    '/_framework/_bin/Mono.Security.dll',
    '/_framework/_bin/Mono.WebAssembly.Interop.dll',
    '/_framework/_bin/mscorlib.dll',
    '/_framework/_bin/System.Buffers.dll',
    '/_framework/_bin/System.ComponentModel.Annotations.dll',
    '/_framework/_bin/System.Core.dll',
    '/_framework/_bin/System.dll',
    '/_framework/_bin/System.Memory.dll',
    '/_framework/_bin/System.Net.Http.dll',
    '/_framework/_bin/System.Numerics.Vectors.dll',
    '/_framework/_bin/System.Runtime.CompilerServices.Unsafe.dll',
    '/_framework/_bin/System.Text.Json.dll',
    '/_framework/_bin/System.Threading.Tasks.Extensions.dll',
    // Application pages
    '/Counter',
    '/FetchData',
    '/Index',
    // The compiled project .dll's
    '/_framework/_bin/HostedBlazorApplication.Client.dll',
    '/_framework/_bin/HostedBlazorApplication.Shared.dll'
];

self.addEventListener('install', function (e) {
    console.log('[ServiceWorker] Install');
    e.waitUntil(
        caches.open(cacheName).then(function (cache) {
            console.log('[ServiceWorker] Caching app shell');
            return cache.addAll(filesToCache);
        })
    );
});

self.addEventListener('activate', event => {
    event.waitUntil(self.clients.claim());
});

self.addEventListener('fetch', event => {
    event.respondWith(
        caches.match(event.request, { ignoreSearch: true }).then(response => {
            return response || fetch(event.request).then(response => {
                caches.put(event.request, response.clone());
                return response;
            });
        })
    );
});
Once the serviceworker.js file is added to the project, the service worker needs to be installed navigator via a script tag in the web-applications Index.html file. The following is the contents of the index.html file located in HostedBlazorApplication.Client \ wwwroot folder.
<!DOCTYPE html>
<html>
<head>
    <meta charset="utf-8" />
    <meta name="viewport" content="width=device-width" />
    <title>HostedBlazorApplication</title>
    <base href="/" />
    <link href="css/bootstrap/bootstrap.min.css" rel="stylesheet" />

    <link href="css/site.css" rel="stylesheet" />

    <!-- begin: Added to install service worker -->
    <link rel="manifest" href="manifest.json">
    <link rel="script" href="serviceworker.js">
    <meta name="theme-color" content="#052767" />
    <!-- end: Added to install service worker -->
</head>
<body>
    <app>Loading...</app>

    <script src="_framework/blazor.webassembly.js"></script>

    <!-- begin: Added to install service worker -->
    <script>
        if ('serviceWorker' in navigator) {
            console.log('Registering service worker now');
            navigator.serviceWorker.register('/serviceworker.js')
                .then(function () {
                    console.log('Service Worker Registered');
                });
        }
    </script>
    <!-- end: Added to install service worker -->
</body>
</html>
The service worker is registered with the window.navigator object via the navigator.serviceWorker properties register method. The register method registers the supplied script as the service worker. Registration tells the browser where your service worker is located, and to start installing it in the background.
The service worker then registers event handlers for the following events:
Install: Actions performed during this event occur when the serviceworker is installed. Typically actions performed during installation are to precache the apps resources. For our instance the event handler caches all app content locally. The content cached locally includes the following:
- Static html and css files – these files are located at HostedBlazorApplication.Client \ wwwroot
- Blazor framework files – located at HostedBlazorApplication.Client \ bin \ [Debug | Release] \ netstandard2.0 \ dist \
- Other additional files – HostedBlazorApplication.Client \ wwwroot
- The web assembly and associated .net files – located at HostedBlazorApplication.Client \ bin \ [Debug | Release] \ netstandard2.0 \ dist \
- The compiled projects dll’s – located at HostedBlazorApplication.Client \ bin \ [Debug | Release] \ netstandard2.0 \ dist \
If caching succeeds the promise returns successful, if not the serviceworker will no be installed. The screenshots below show the HostedBlazorApplication PWA in the Edge Chromium browser

Successful Server Worker installation
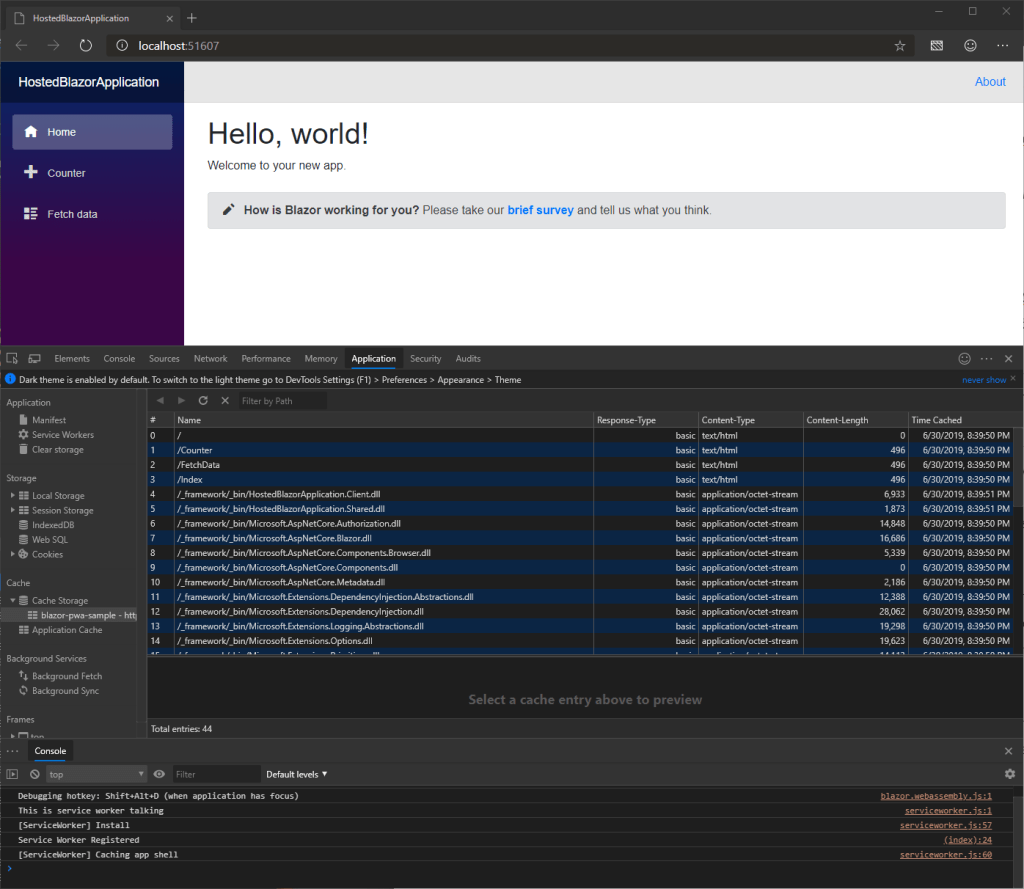
Successful Server Worker installation, Note the cached application files
Activate: Once successfully installed the service worker transitions into the activation stage. In our example event.waitUntil(self.client.claim()) to buffer functional events such as fetch and push until the promise is passed (i.e., until the service worker sets itself as the controller of all clients within its scope).
Fetch: Attaching to the fetch event allows the PWA to check the cache and determine whether or not the requested resource(s) are in the cache. If they are, it is returned. If the requested resource(s) are not in the cache, the code will get the resource(s) from the network and send it to the page and add them to the cache at the same time.
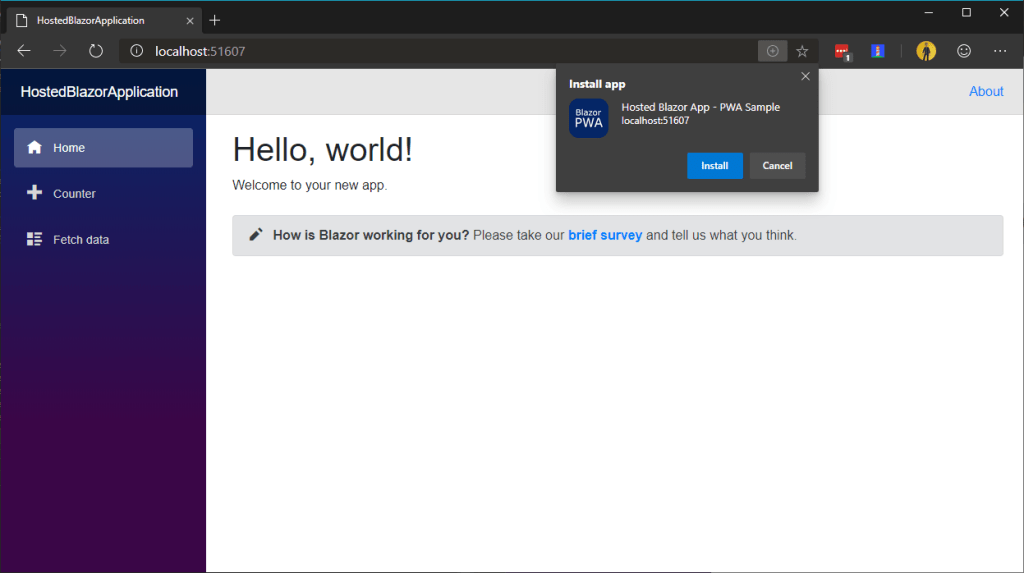
Now that our Blazor application has been transformed into a PWA, we can install the application directly to our device whether that device be a phone or a desktop computer. No store required, we can install directly from the web-application.

Remember as you add additional application files, .NET assemblies, and pages the files to cache list will need to be updated to include those files, resources, and associated assemblies
Additional service worker resources are available via the following resources:
- Caching files with service worker
- Offline Cookbook
- PWA Checklist
- Introduction to service worker
- Microsoft PWA reference material
- Google PWA reference material
Deliver Content of https
The high level steps to deliver content over https are as follows:
- Generate a 2048-bit RSA public/private key pair.
- Generate a certificate signing request (CSR) that embeds your public key.
- Share the CSR with a certificate authority (CA) to receive a final certificate or certificate chain.
- Install the certificate on your web-server, refer to server specific documentation for certificate installation.
Note: these steps were taken from the Google developers site
Summary
Building PWAs with Blazor allows we .NET developers to build truly cross platform applications and utilize our C# skills. In addition there is top notch tooling available for C# and web development with Visual Studio and Visual Studio Code.
Other awesome .Net Core and Blazor Resources
- Microsoft Blazor Documentation
- dotnetcore Show and via twitter @dotnetcoreshow
- Ed Charbeneau and via twitter @edcharbeneau
- Chris Sainty and via twitter @chris_sainty
